and get down and dirty into editing photos and cutting out scrapbook elements. Im looking for some more scrapbook products and found amazon to be a great resource for that.Heck saves a trip to the store doesnt it. Photos are on the way. Camera needs batteries first though.In the mean time im going to go back to amazon and check out their scrapbook products
Sunday, April 26, 2009
scrapbook products
Spring has sprung !!! and summer is on its way, time to get the scrapbooking under way. Recently we've been doing some scrapbooking. We have a few new additions to the family. Two dogs to be precise. So weve been snapping off lots of photos of them. My girlfriends sister has done a mini scrapbook of our dogs and us. Which is just fuelling the desireto break out the scrapbook products
Wednesday, October 17, 2007
Scrapbooking Technique: Creating background template
Heres an a cool easy Scrapbook technique for creating a background template from a photo.
Our 6 yr old boy , wow he's going to be turning 7 in just under a week, amazing how time flies, is in hockey now YAY we're hockey parents now !!
So we were thinking about doing a hockey scrapbook. Following a previous post - 3 easy scrapbooking techniques
We fill our digital camera every game he goes to so we have quite a few (hundreds now) of photos of him on the ice.
So I thought it would be very cool if we took a few of the photos and selected one of them as a background template photo for the hockey scrapbook.

I have a cool tip I got from our 6 year old about using velcro!!! I'll save that for another day though.
Our 6 yr old boy , wow he's going to be turning 7 in just under a week, amazing how time flies, is in hockey now YAY we're hockey parents now !!
So we were thinking about doing a hockey scrapbook. Following a previous post - 3 easy scrapbooking techniques
We fill our digital camera every game he goes to so we have quite a few (hundreds now) of photos of him on the ice.
So I thought it would be very cool if we took a few of the photos and selected one of them as a background template photo for the hockey scrapbook.

New scrapbook techniques to keep your pages unique and fresh can be tough to find. If you have taken a particularly good scenic shot, have it blown up and use it as a page background. You can have the image enlarged as is, or you can have the image washed out so it fades into the background. Mat other photos or a smaller version of the same photo over the top.As you can tell we're big users of digital scrapbook techniques. We like to use Adobe photoshop as our digital tool of choice, I use it mostly as a lay out tool then I print off the cropped photos and generally follow the digital photo template I have created.
I have a cool tip I got from our 6 year old about using velcro!!! I'll save that for another day though.
Saturday, October 6, 2007
5 easy scrapbook page layouts tips
 Heres a scrapbook page layout tip, that I've found works very well for me and my girlfriends sister.
As you can see from the scrapbook layout above there. We've designed this scrapbook page digitally. We don't typically do digital scrapbooks, but it is another way of sharing your scrapbook pages with friends and family who are in other parts of the country or even the world.
You can share these in email or flickr, or which ever online photo sharing site you like.
In this example my sisters girlfriend has used the gimp (a photo editing software package - it's free) I prefer using adobe photo shop, to do this scrapbook layout.
Whats great about using digtal scrapbooking tools is that you can do a quick page layout so you can get a feel for how the project is going to look before you commit anything to paper and get messy with glue.
Once you have your general scrapbook layout in mind you can then decide:
1.) upon a scrapbook theme,
2.) what type of materials you want to use,
3.) how you want to organize the scrapbook elements on the page.
4.) Which scrapbook font you want to use.
5.) A good scrapbook title.
In this example: Some Beautiful silver and gold accents make a wonderful touch to lettering or tags on this scrapbook page.
This would also add a very elegant touch on gift scrapbooks or invitations.
To make these accents, stamp a piece of vellum with embossing ink and heat and stick powder. Next, Heat the item.
Then, using a small paintbrush, paint this piece of vellum with gold leaf. Brush off the excess powder with a brush. And bingo you're done and you have a very beautiful and elegant scrapbook layout
Saturday, September 29, 2007
How to scrapbook - what is scrapbooking?
Do you want to know How to scrapbook ? Do you remember those days as a kid before you knew how to scrapbook ?. The hours spent pasting newspaper clippings onto paper and bundling dozens of papers together with some fancy ribbon or a string? you dug out of the x-mas decorations box in your basement? Do you also remember all of your hard work learning how to scrapbook falling apart two months later?
Night mare wasn't it?
Now there's a grown up way to save and preserve your treasures: Scrapbooking.
The idea behind scrapbooking really hasn't changed all that much since grade school neither have the scrapbooking tips. You can still place photographs, newspaper clippings, poems, and tickets into your scrapbook to display and preserve your memories. And the best part of it all? Learning how to scrapbook isn't really all the hard.
Just pick a few photos, decide upon a scrapbook theme, go get some scrapbooking supplies. And START!
One of my first scrapbooks now that I come to think about it, was a concert tickets, photos and autographs book, I made in high school.
If you're stuck for scrapbook ideas or just need some templates. We all get stuck here's a great product called memorable scrapbooking. I have been using for the past few weeks. I got into a bit of a rut or a scrapbookers block after my last scrapbooking project. I think I may try the origami scrapbook template in the book I linked to ,some time soon. Anyways check it out Memorable Scrapbooking
I'll bet you have noticed that scrapbooking techniques and tools have matured substantially since you were a kid. Scrapbooking albums have replaced the messy bundles of paper.
Now you can bind or place your keep sakes and photos and cards in a three-ring binder. In this way, your hard work won't fall apart. Furthermore, new specialized covers (acid free plastic) allow protection from the outside elements. I tend to scrapbook alot bigger than that but thats just me.
Paste and glue? thing of the past. Ive been using Specialized glue dots and two-sided tape. Makes mounting your treasures simple and mess free. Nothin' worse than having glue all over everything and everywhere. Many of these products are so strong that you can now decorate your scrapbook pages with ribbons, feathers, flowers, or even metal charms. I may even try hanging my kid on a wall with them, but thats another story.
Like all new inventions and innovations and the creation of new scrapbook techniques and tools, the uses of scrapbooking have expanded drastically. Scrapbooking is still used to hold personal keepsakes and for gift giving.
However, now scrapbooking techniques can be used to make baby announcements, grandparent books, gift cards, artwork for kid's rooms, recipe books, and even educational tools.
Tags:
Friday, September 21, 2007
How to scrapbook - 10 easy scrapbook tips and techniques
10 Easy Helpful Scrapbook Tips and Tricks
After a few months of figuring out how to scrapbook , I've come to the conclusion that there are a few basic and easy scrapbooking tips that might help you scrapbook more efficiently. And these 10 easy scrapbooking tips have helped me create awesome pages in my books.
So with out further ado Here are a few of my 10 favorite scrapbooking tips...
- Keep it clean. When working with glue, markers and other messy objects, make sure to wash your hands frequently. When they are clean, they won't mussy up your pages and photos.
- Hoard all your scrapbooking paper--you never know when you might need it. (bad tip I know the spouses freak out when they boxes of "stuff")
- Whats old is new again. Have old maps? or wrapping paper and fabric scraps? USE THEM!!. These add an extra dimension and texture to scrapbook projects and They're CHEAP!
- Use double-sided tape. To tape photos and paper to the scrapbook pages. The plus point? easy to remove if you mess up or dont like the placement of a picture or decide to make obsessive changes the scrapbook layout. TIP, double-sided tape won't make your pages ripple like glue does.
- Protect and preserve your pages in plastic sheets. Just make sure they'll fit your scrapbook . The plastic Sheets will help keep the pages clean and neat for years to come. Learned from Grandpa hes a map maker and he uses plastic sheets to protect his maps.
- Rip it up. Use Ripped edges. To create a cool look on your pages, take a piece of paper and rip it along one side. This creates a neat looking border with a cool edge again it adds that extra dimension and some texture.
- Bigger isn't always better. Small scrapbooks that portray a particular memory, family member or friend make great gifts!!. Find books that are 6" by 6". Small books are quick and easy scrapbook themes.
- Bad Handwriting? Use alphabet stickers.
- Crumpling. Crumple up your cardstock. It adds visual interest,texture and dimension to the page.
- TELL A STORY. Don't just display your photos, tell stories! Did something really funny happen at last year's family reunion? Did uncle Tom fall in the pool? Did little johnny face plant in the birthday cake. Tell stories and and use quotes on your pages, your scrapbook will communicate on a more personal level. Words and pictures stick in the memory longer.
Tags:
Sunday, September 16, 2007
How to scrapbook - the back to school scrapbook project
I'm in the process of doing a digital scrapbooking project. Im going to call it the back to school scrapbook.
What we did was take a bunch of photos of our 7 year old boys school work from last year and saved them to our computer.
From this we're going to do a scrapbook project with a back to school theme. That we can then send to our far flung family in other parts of the planet. Right now I'm creating a scrapbook back ground to use for scrapbooking templates for the rest of the project to later place images on using adobe photo shop.
Here's how I'm doing it.
The first thing I did was to load up the image in photoshop. The screen capture here is small so it would fit in this post box.
Creating a Scrapbooking template
Again this is just one of the 30 or so pictures we took of his school work from last year.
Which brings up a good idea. Instead of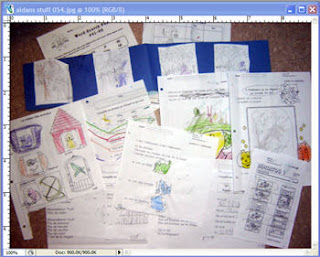 stock piling all your child's school work and saving it FOREVER.
What you can do is to take pictures of it then THROW IT OUT.
As I am sure you know your child is going to come home with all kinds of crafts and home work and writing samples and pictures they have created over the course of their school year. WHY KEEP IT ALL. Take pictures of it and then later do a scrapbook of it.
Ok that out of the way.
Selecting an area to crop
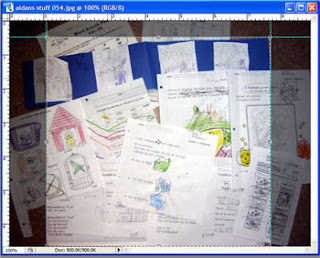 What I wanted to do next was crop out a lot of the floor tile you see in the picture there.
I made my selection by using the move tool to grab the grid line on the edge of the photo box and the top of the photo box until I had an area I was comfortable with using and then cropping.
You can see what the process looks like.
I hope the grid lines are visible in light blue in this image.
Using the crop tool
This is what the crop tool looks like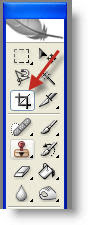 on your adobe photoshop work space.
the crop tool allows you to select an area and remove what other background you want from your digital scrapbook element.
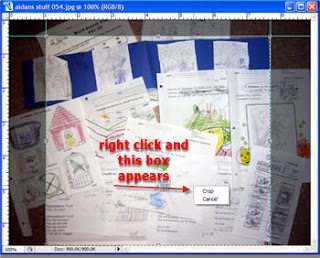 Once you have your scrapbook template image area selected.
You right click your mouse and a little box pops up asking you to crop or cancel.
Select crop.
The Final Cropped Scrapbooking template back ground
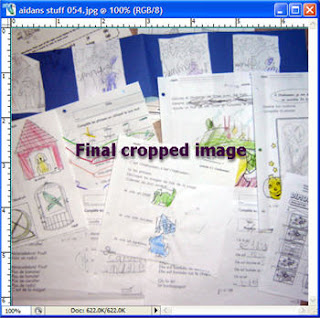 This obviously is the final cropped scrapbooking template I am going to use as my background for this project.
Now all I have to do is to add other elements to it.
Such as other scrapbook photos and some fonts and I'm and running.
Tags:
What we did was take a bunch of photos of our 7 year old boys school work from last year and saved them to our computer.
From this we're going to do a scrapbook project with a back to school theme. That we can then send to our far flung family in other parts of the planet. Right now I'm creating a scrapbook back ground to use for scrapbooking templates for the rest of the project to later place images on using adobe photo shop.
Here's how I'm doing it.
The first thing I did was to load up the image in photoshop. The screen capture here is small so it would fit in this post box.
Creating a Scrapbooking template
Again this is just one of the 30 or so pictures we took of his school work from last year.
Which brings up a good idea. Instead of
 stock piling all your child's school work and saving it FOREVER.
What you can do is to take pictures of it then THROW IT OUT.
As I am sure you know your child is going to come home with all kinds of crafts and home work and writing samples and pictures they have created over the course of their school year. WHY KEEP IT ALL. Take pictures of it and then later do a scrapbook of it.
Ok that out of the way.
Selecting an area to crop
 What I wanted to do next was crop out a lot of the floor tile you see in the picture there.
I made my selection by using the move tool to grab the grid line on the edge of the photo box and the top of the photo box until I had an area I was comfortable with using and then cropping.
You can see what the process looks like.
I hope the grid lines are visible in light blue in this image.
Using the crop tool
This is what the crop tool looks like
 on your adobe photoshop work space.
the crop tool allows you to select an area and remove what other background you want from your digital scrapbook element.
 Once you have your scrapbook template image area selected.
You right click your mouse and a little box pops up asking you to crop or cancel.
Select crop.
The Final Cropped Scrapbooking template back ground
 This obviously is the final cropped scrapbooking template I am going to use as my background for this project.
Now all I have to do is to add other elements to it.
Such as other scrapbook photos and some fonts and I'm and running.
Tags:
Friday, September 14, 2007
3 easy scrapbooking tips techniques - Creating Scrapbook designs
Creating Scrapbook designs
Basically, there are THREE main parts to your scrapbook design.
1. Your Photos
2. The Background Design You Lay Your Scrapbooking Photos Out On
3. The Journaling (or the text that describes the photos in your scrapbook)
Seems like a simple Scrapbooking tip huh. And really, it is! There's really not too much more to this scrapbooking technique than those three parts.
Don't let it get overwhelming and complicated.
The rest is left up to your creative mind to hash out. The placement of the photos, the pieces that make up the background design, and the meaningful journal entries are all left up to your form of individual expressionism.
With that said, it's time to get your scrapbook thinking cap on and let your imagination run wild! A good way to come up with creative scrapbooking ideas is to view other scrapbooking samples. And keep a pen and paper handy to write down any ideas that begin to sprout from the scrapbook layout designs of others you're viewing.
And keep in mind that you want to create something ORIGINAL, not just a carbon copy of someone else's work. If it is a design that you really like and would like to try and duplicate, remember to put your own unique spin on the layout.
Otherwise, you will be plagiarizing another person’s hard work!
Some Quick & Useful Scrapbooking tips
If you have a flatbed scanner, you can still make good use of any physical scrapbook kits sold in crafting stores off and online. Basically, anything can be scanned and turned into a digital scrapbooking tool you can utilize time and time again!
Don’t forget that places like Stock X-Change and iStockPhoto have wonderful elements that you can add to your digital scrapbook collage as well! Just type in what you are looking for in either site’s search box, download, and there you have a free digital scrapbooking elements!
Also, free clipart , free scrapbooking fonts , scrapbooking templates and backgrounds that you can get from the net make great digital scrapbooking elements too! Using your favorite browser and Yahoo! Search or Google, type in “free clipart” or “free backgrounds” and you’re off! Remember though, most of the images you find will be free for personal use only, so you won’t be able to sell your digital layouts.
 Another great way to come up with some cool scrapbook collages is to think up a theme based on the event taking place in the photos. Where did you go? What are some of the things you did? Is this revealed in the pictures? Most times when we take photos of family outings there is a
BEGINNING - MIDDLE - END type set up within the act of taking the pictures. So, use that to help you layout your scrapbook. (as you can see I have more than few folders of scrapbook images from previous family events)
Depending on the amount of pictures you have , we have TONS and the activities you did while on your outing, you could even break those up into separate layout ideas.
When you scrapbook, pretty much anything goes. If you don't believe this, just take another look through all the scrapbooks of others!
If you're still stuck for an idea to get started creating your own scrapbook, you can download these special scrapbook template packages that can be edited with a simple HTML editing program or photo editing program that accepts .PSD (the Photoshop file extension) files. At the very least they will give you some nice looking background components and special free scrapbooking fonts you can use in your scrapbook creations. And they should give you some good ideas to get started with as well.
FREE SCRAPBOOKING IDEAS & LAYOUTS FROM HP
http://h10050.www1.hp.com/activitycenter/us/en/scrapbooks.html
FREE SCRAPBOOKING EXTRAS FROM ABOUT.COM
http://scrapbooking.about.com/od/freestuff/
BELLA ONLINE FREE FONT LISTINGS
http://www.bellaonline.com/subjects/2749.asp
RAGGEDY SCRAPPIN
http://www.raggedyscrappin.com/store/Default.asp (Links To Freebies
Are At The Bottom Of The Page)
CASHEW STYLE
http://www.cashewstyle.com/downloads/index.php
COMPUTER-SCRAPS
http://www.computer-scraps.com/home_page/freebies.php
SCRAPBOOK TEMPLATES
http://www.scrapbook-templates.com/
Now, as far as the journaling part of this process goes, I found a wonderful article that will give you a few more ideas and make journaling easier for you. Read 'Stress-Free Scrapbook Journaling Ideas' by Elaine Clay right here:
http://www.christian-mommies.com/special-features/just-formoms/
stress-free-scrapbook-journaling-ideas/
Once you've gotten your layout all done up using your image editing tool(or however you decided to do this), you will need to be sure to save the scrapbook page as a WHOLE IMAGE in an easily viewable format such as .JPG or .GIF. For the best looking image, you will want to use the .JPG format as it gives you the best image quality. And use the highest quality setting, or 100% when saving.
So, you've got your head full of some scrapbooking tips, techniques and layout designs all ready to go. Now all you need is a place to put them and show them off.
Tags:
Subscribe to:
Posts (Atom)
